Make Easy Wood Picture Frames With Glass
Create the look of a professional photo frame (complete with inset glass!) without picking up a router. While you typically need to carve a groove for the glass to drop into, we'll show you how to use a strip of wood (we used paint sticks) to create the inset instead. To finish the look, just cap the edges with a trim piece, and add the tabs to hold the glass and photo in place.
Cost: $12
Time: 1 hour (plus drying time between steps)
Difficulty: Easy. Simple miter cuts and wood glue construction make this a great beginner project.
*This materials list is made to fit an 8″x10″ glass insert
(1) 8″ x 10″ Glass Insert
(1) ¼" x 2 ½" Lattice – Get 5 feet to create the frame's Surround
(1) ½" x ¾" Trim – Get 6 feet to trim the outside edges of the frame and make the Kickstand
(8) Paint Sticks to pad the back of the frame around the glass
(4) 1 inch Turnbuttons to hold the glass and photo in the frame. I found mine at Michael's
(4) 3/8″ wood screws to attach the Turnbuttons
(1) 1 inch hinge to attach the Kickstand
Wood Glue
*This cut list is sized to fit an 8″x10″ glass insert
¼" x 2½" Surround (Top and Bottom) – 2 @ 14 ½ inches (miter ends at opposing 45-degree angles)
¼" x 2½" Surround (Sides) – 2 @ 12 ½ inches (miter ends at opposing 45-degree angles)
Paint Sticks (Padding: Top and Bottom) – 4 @ 12¼ inches
Paint Sticks (Padding: Sides) – 4 @ 10¼ inches
½" x ¾" Trim – Cut to Fit (Miter ends at opposing 45-degree angles)
Steps
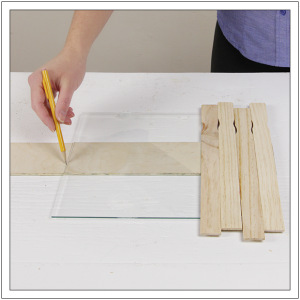
1. Size the Surround
The size of the ¼" x 2½" picture frame Surround can be found by adding the width of four paint sticks to the height and width of the glass. Mark one board at the total height of the frame's Surround, and a second board at the total width of the frame's Surround.
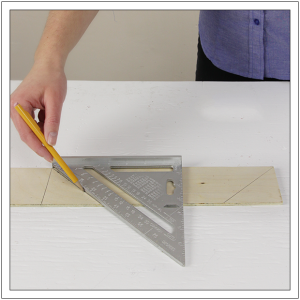
 2. Mark the Miter Cuts
Using a speed square, mark opposing 45-degree angles on the boards marked in Step 1. Using a miter saw, cut both ends of each board. Once complete, use each board to mark an additional piece. Cut the newly marked pieces to size. You should now have two identical Surround "Sides" and identical Surround "Top" and "Bottom" pieces.
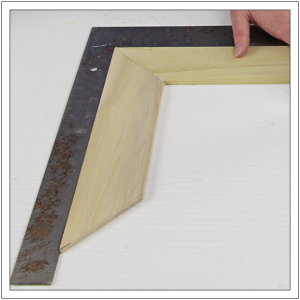
3. Size the Trim
While you can wait until the Surround is assembled to cut the ½" x ¾" Trim pieces to fit, it's easier to show the sizing method now with an individual piece. Set a piece of trim on edge alongside the outer edge of a piece of Surround. Using a speed square, mark a 45-degree line that follows the angle of the Surround. (i.e. the short point of the trim should rest on the point of the Surround, as shown.) Size and cut a Trim piece to fit each individual piece of the Surround. Mark the corresponding parts with numbers 1-4, and then set the Trim pieces aside.
Tip: Looking for a safe way to cut the Trim? Check out my Safety Cutting Jig tutorial! All you need is some scrap wood and clamps to keep your hands away from the miter saw blade.
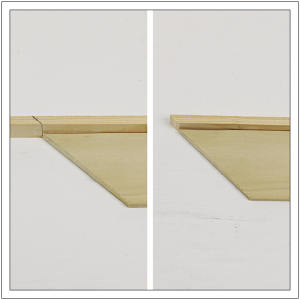
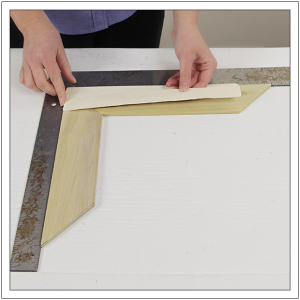
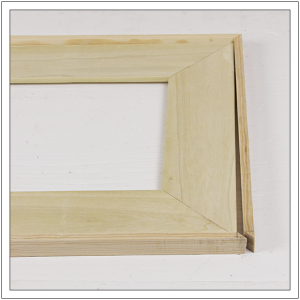
4. Dryfit the Surround Pieces
On a flat surface, layout the Surround pieces to create a rectangle. Check that all the miters fit tightly against one another.
5. Secure the First Joint
Lay a framing square on the work surface. This will hold the Surround pieces square during placement and assembly. Slide the Surround's Bottom and Left Side pieces into the corner of the framing square face down. Apply wood glue to the edges of the miter cuts and press them together. Wipe away any excess glue.
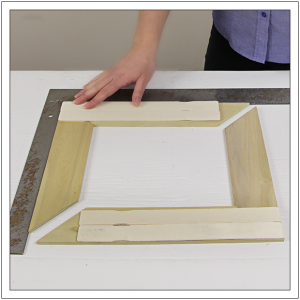
6. Strengthen the Joint
Apply wood glue to two paint sticks and place them face down on the Surround. Adjust the paint sticks so that they lay over the Surround's miter joint and are flush with the outside edges, as shown. Lift the framing square away from the assembly, so as not to disturb the glue and positioning. Set the framing square back on the table beside the assembly, and use it repeat Steps 5 and 6 to join the Surround's Top and Right Side pieces.
7. Position the Parts
Slide the assembled Top and Right Surround pieces against the assembled Bottom and Left Side pieces.
8. Assemble the Remaining Joints
Shift an "unjoined" miter into the corner of the framing square. Apply wood glue inside both miter joints, and then press the two "halves" of the frame together. Apply wood glue to the shortened paint sticks, and then press them firmly into place on the Surround, flush with the outside edges. Allow the glue to completely dry before moving on to Step 9.
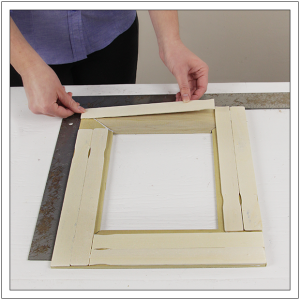
9. Attach the Trim
Once the glue has dried, flip the Surround face up. Set the Trim pieces around the Surround so that they rest on edge on the work surface and create a raised reveal above the Surround. One-by-one, apply wood glue to the outside edge of the Surround, and then press and clamp the Trim in place. Be sure to apply glue to the mitered ends of the Trim as you work your way around the frame. Allow the Glue to completely dry before moving on the Step 10.
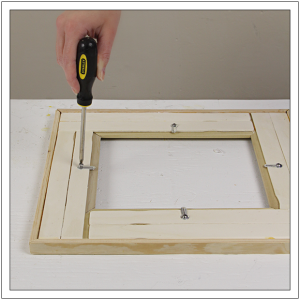
10. Attach the Turnbuttons
Using a drill/driver, drill shallow pilot holes into the center of each inner paint stick. Using a screwdriver, carefully drive 3/8-inch screws through the opening in the Turnbutton, and into the paint stick. Tighten until the Turnbutton feels secure, but can still swivel.
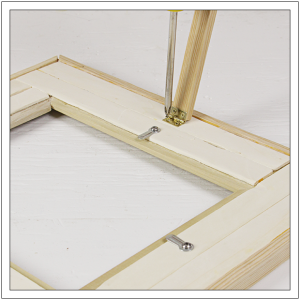
11. Attach the Kickstand
Place the hinge on the backside of the Kickstand, so that the knuckle of the hinge flops over the top edge of the board. Drill pilot holes through the holes in the hinge, and into the Kickstand. Be sure to drive the pilot holes to the full depth of the hinge screws to prevent splitting. Drive the hinge screws through the hinge and into the pilot holes in the Kickstand. Next, attach the hinge to the backside of the frame by driving pilot holes, followed by the screws, through the paint stick in the center of the width of the frame, as shown.
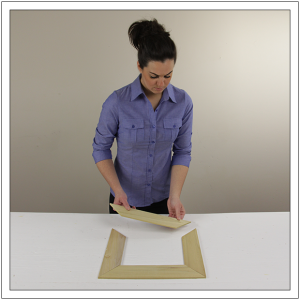
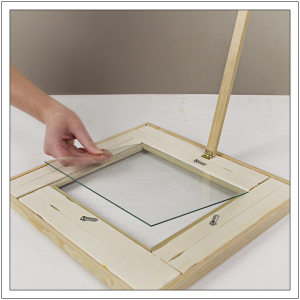
12. Insert the Glass
Swing the Turnbuttons outward. Place the glass into the opening so that it rests on the backside of the Surround, inside the paint sticks. Follow with a mat board and photo, and then swing the turnbuttons back around to hold the glass, mat and photo inside the frame.
MORE BUILDING PLANS
Source: https://build-basic.com/build-a-diy-photo-frame/
0 Response to "Make Easy Wood Picture Frames With Glass"
Post a Comment